How to measure head for kids bike helmet is mostly about getting one number right, then confirming the fit with a few simple checks, because a helmet that rocks, pinches, or sits too high may not protect as intended.
If you have ever ordered a “small” that still wiggles, you already know the frustration, kids’ sizing varies by brand, and “age range” labels rarely match real head shapes.
In this guide, you will get a fast measuring method, a practical size table you can actually use, and a short try-on routine that catches the common problems people miss when they shop online.
What you need before you measure (and what not to use)
You do not need special tools, but you do need the right kind of “tape” and a calm minute with your kid.
- Soft measuring tape (tailor tape) is ideal.
- If you do not have one, use string + a ruler (mark the overlap point, then measure the string).
- A mirror helps if you measure solo, but measuring a child is usually easier with two people.
Avoid stiff construction tape measures for this step, they tend to lift off the head and add error, especially with kids who move a lot.
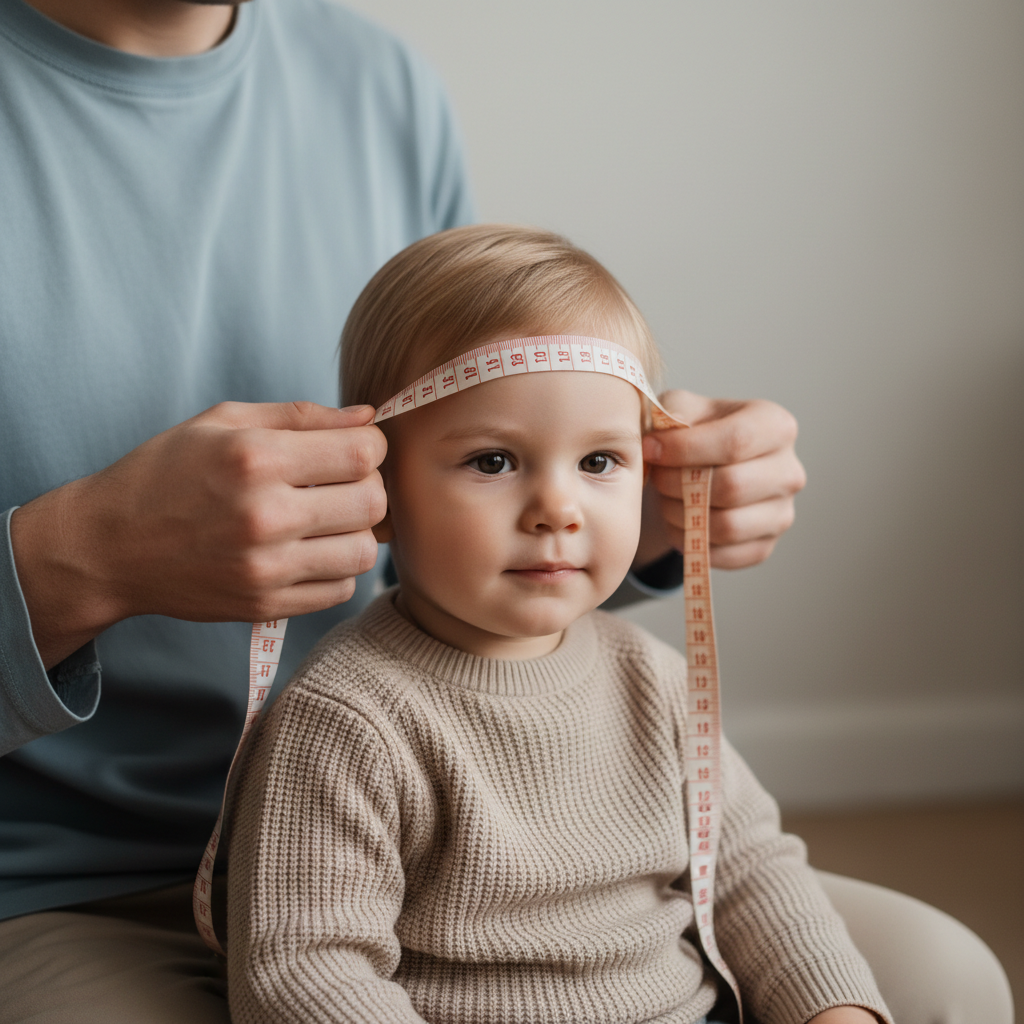
Step-by-step: measure head circumference the helmet way
The circumference number that helmet brands typically want is taken around the widest part of the head, not where a hat sits for style.
1) Find the right measuring line
Place the tape about 1 inch (2–3 cm) above the eyebrows, above the ears, and around the back where the head is fullest. Keep the tape level, not angled.
2) Snug, not tight
Pull the tape so it sits flat against hair, but does not compress the skin. With thick hair or braids, you may want to measure twice, once with hair “as worn for riding.”
3) Take 2–3 readings
Kids wiggle, tape slips, and one reading can be off. Take a couple measurements and use the middle value if they vary.
4) Record in centimeters (and inches if you want)
Most helmet size charts are in centimeters. If you only have inches, convert, but it is usually simpler to keep cm as your “shopping number.”
According to the U.S. Consumer Product Safety Commission (CPSC), bicycle helmets should fit properly and be worn level to help reduce the risk of head injury in a crash, so measuring for the right size is not busywork, it is part of basic safety setup.
Kids helmet sizing chart: quick reference (then verify with the brand)
This table helps you narrow down the likely size range, but brand charts still win if there is a conflict.
| Head circumference | Common kids helmet label | Notes |
|---|---|---|
| 46–50 cm (18.1–19.7 in) | Toddler / XS | Often fits ages 1–3, but head shape matters more than age. |
| 50–54 cm (19.7–21.3 in) | Child / S | Very common “little kid” range, check adjuster span. |
| 54–58 cm (21.3–22.8 in) | Youth / M | May overlap with adult S, especially for older kids. |
| 58–62 cm (22.8–24.4 in) | Youth L / Adult M | Less common for kids, but not rare for teens. |
If your child is right on the edge between sizes, do not guess yet, you need to consider head shape and the helmet’s adjustment range, not just the headline size.
How to tell if the helmet fit is actually right (the 60-second check)
After you measure and pick a likely size, the try-on matters, because two helmets with the same size range can feel totally different.

- Level + low: Front edge sits about 1–2 finger widths above the eyebrows, not tipped back.
- No rocking: With the strap buckled, gently push the helmet front-to-back and side-to-side. It should not slide around.
- Strap “V” at the ears: Side straps meet just under each ear, not over the ear or far behind it.
- Chin strap test: You should fit about 1–2 fingers under the strap, snug enough that the helmet does not lift when you pull up at the front.
- Comfort check: No sharp pressure points after a few minutes. Some “new helmet tightness” is normal, hot spots are not.
If you are wondering why this matters, the helmet needs to stay in place during movement and impact, even small shifts can expose the forehead or move the shell away from where it should protect.
Common measurement mistakes (and what to do instead)
Most sizing problems come from a few repeat issues. Fixing them usually takes less time than doing a return.
- Measuring too high: If you measure like a fashion headband, you will often buy too large. Keep the tape above the eyebrows and ears.
- Measuring over bulky hairstyles: If your child rides with a high ponytail, plan for it, but for most kids you can measure with hair down and then adjust straps around the style.
- Trusting age labels: “Ages 5–8” is marketing guidance, not sizing. Use circumference first.
- Ignoring head shape: Some kids have rounder heads, others more oval. If a helmet pinches at the sides but floats front/back, you may need a different model, not a different size.
- Over-cranking the dial: A rear adjuster is for fine-tuning, not forcing an undersized shell to fit.
Choosing between two sizes: a practical decision rule
When you land between sizes, the “right” choice depends on how the helmet behaves before you touch the adjuster.
- If the smaller size sits level, does not pinch, and the dial is near the middle of its range, the smaller size often makes sense.
- If the smaller size leaves a red mark quickly, rides high, or feels like it cannot settle down over the crown, move up.
- If the larger size only feels stable when the dial is maxed out, it is usually too big long-term, padding compresses over time.
One more nuance, kids grow fast, but buying “room to grow” can backfire if the helmet shifts today. A safer approach is a helmet that fits now with a little adjuster range left.
Real-world tips for online orders, returns, and multi-sport helmets
Online shopping is convenient, but it pushes you to rely on charts. A few habits reduce guesswork.
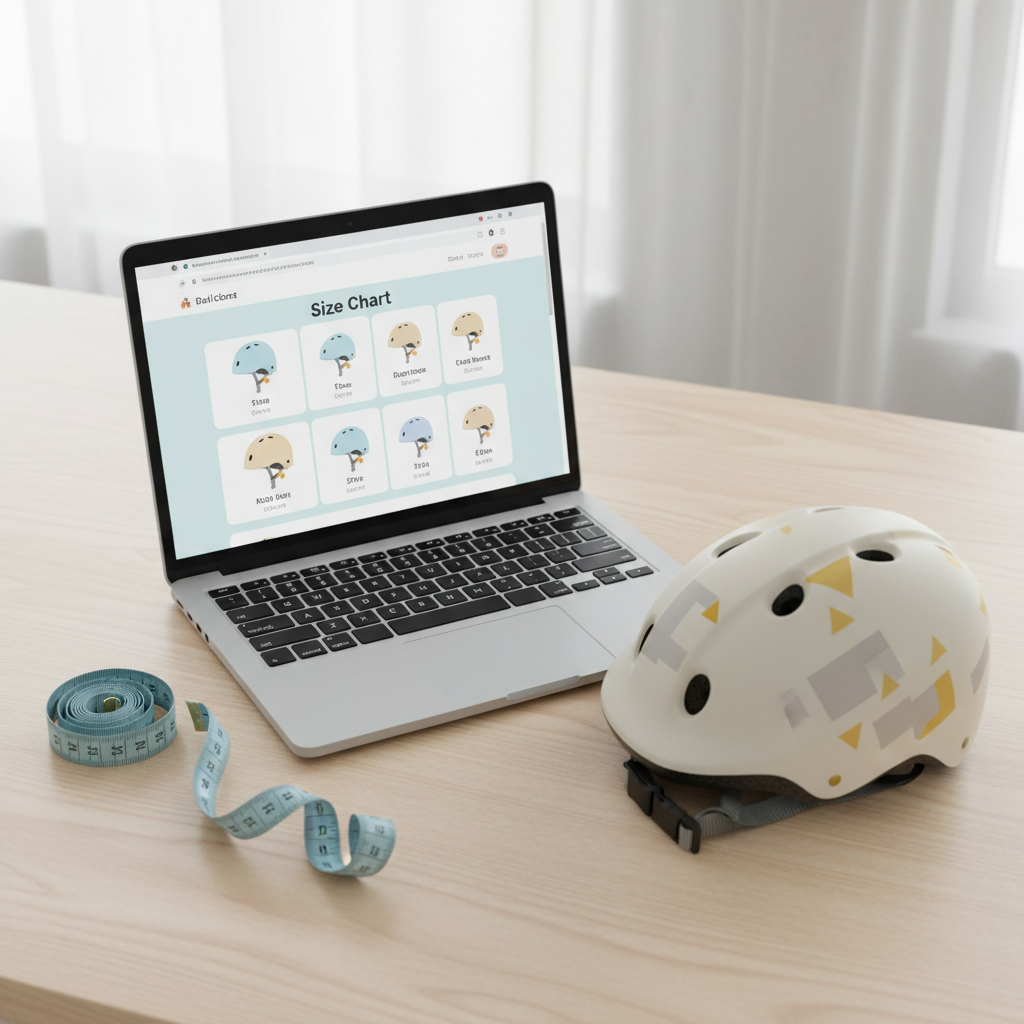
- Check the posted size range and the adjuster span: Some “50–54 cm” helmets really feel best in the middle of that range.
- Read the fit notes: Many brands mention “round fit” or “oval fit.” If you see repeated reviews about pressure points, take that seriously.
- Keep tags on during the first fit test: Do the 60-second check indoors on carpet, just in case you need to return.
- Multi-sport vs bike: Skate-style helmets can fit differently and may sit lower. Use the brand chart for the exact model, not a general bike chart.
According to the National Highway Traffic Safety Administration (NHTSA), correctly fitting bicycle helmets can help reduce the risk of head injury, and proper use includes snug straps and level positioning, so treat fit like part of the purchase, not an afterthought.
When to replace a kids helmet (and when to ask for help)
Measuring is only one piece of the safety picture. If you are unsure about condition or fit, it is worth slowing down.
- After a crash or significant impact: Many manufacturers recommend replacement after a hit, even if damage is not obvious. If you are unsure, consult the helmet brand or a bike shop.
- When it no longer fits: If the helmet sits too high or cannot be snug without discomfort, it is probably time to re-measure.
- Visible damage: Cracks, crushed foam, or straps that will not hold adjustment are red flags.
- Medical considerations: If your child has a medical condition, head sensitivity, or needs adaptive equipment, it may be smart to consult a pediatrician or an experienced fitter.
Key takeaways: measure circumference at the correct line, use the brand’s chart, and confirm fit with the level-and-no-rocking checks before your child rides.
Conclusion: measure once, check twice, then ride
Once you know the right circumference and you can confirm a stable, level fit, buying a kids helmet gets much less stressful, and your child is more likely to keep it on without complaining.
Action steps that usually work: measure again tonight when your kid is calm, then pick a size that lands near the middle of the adjuster range, and do the quick fit test before the first real ride.
If you want, share your child’s head circumference and the helmet model you are considering, and I can help you interpret the size chart and what to watch for during the try-on.